The most common elements to which to apply security are tables, lists, grids, and groups defined in a table.
For each element that requires security, right click the element, then select Security from the context menu. Set the Access Control List Expression property to the security ID or IDs to which to grant access to the element’s content.
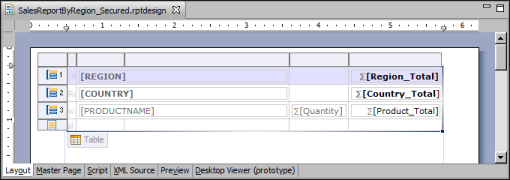
Figure 23-4 shows the design for the sales report shown in the previous section. The report design consists of a single table that groups data by region, country, and product.
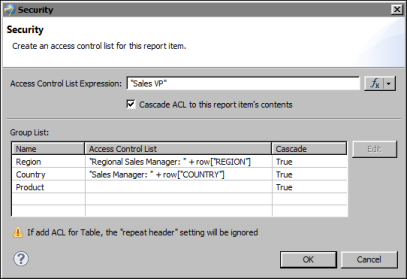
Page-level security is applied to these elements: the table, the Region group, and the Country group. Figure 23-5 shows the Security dialog for the table element.
|
|
The Cascade ACL option is selected. This setting propagates the specified ACL to all the elements in the table.
|
This expression specifies that data for each region is restricted to a specific regional sales manager role. For example, only a user with the Regional Sales Manager: Europe role can view the sales data for Europe.
|
|
Cascade is set to True. This value propagates the ACL to the elements in the Region group, providing the regional sales manager access to all the data within the Region group.
|
This expression specifies that data for each country is restricted to a specific sales manager role. For example, only a user with the Sales Manager: France role can view the sales data for France.
|
|
Cascade is set to True. This value propagates the ACL to the elements in the Country group, providing the sales manager access to all the data within the Country group.
|
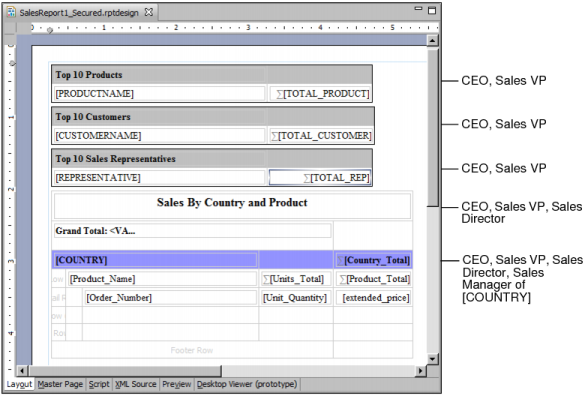
This example shows how to implement page-level security in a report that contains multiple tables. Figure 23-6 shows a report design that contains four tables and identifies the roles that can view each table. The last table shows detailed sales data grouped by country and product. The CEO, Sales VP, and Sales Director can view all the content in this table. Each sales manager can view only the sales data for her country.
|
Figure 23-6
|
Design of report that contains four tables and the roles that can access each table
|
|
|
Select each table and set each table’s Access Control List Expression property to the roles identified in Figure 23-6.
|
"CEO" + "," + "Sales VP" + "," + "Sales Director" + "," + "Sales Manager of " + row["COUNTRY"]
|
|
Use the Cascade ACL option to cascade security IDs from a container element to its contents. Because the CEO and Sales VP roles can view the entire report, it is more efficient to specify the ACL once at the topmost container, the report element, than it is to specify the same ACL multiple times.
|
|
|
Add a grid to the report, place all the tables in the grid, and cascade the "CEO" + "," + "Sales VP" ACL expression from the grid instead of from the report element. This design is more versatile than the previous one because it is often practical to leave the ACL at the report level blank to grant all users access to the report. Later, if you add new sections, such as a title page, for a broader range of users, it is easier to start with the rule that all users can view all the content in a report, then restrict access to particular sections.
|
The report examples in this section illustrate several key concepts about page-level security, which are summarized next. Understanding these concepts can help you design a report to use page-level security.
|
|
When an element’s ACL expression property is blank, there are no viewing restrictions for that element, except those restrictions (determined by the ACLs) that the element inherits from its container.
|
|
|
An element inherits the ACLs from its container when the container’s Cascade ACL option is selected. This option, selected by default, means that a user who is permitted to view a container can also view all elements within the container.
|
|
|
The report element is the topmost container. If its ACL expression property is blank, BIRT assigns an internal ACL of "__all" to the report. This setting combined with the selected Cascade ACL option ensures that a report created initially is accessible to all users.
|
|
|
BIRT generates one report document, inserting a page break between elements that have different ACLs. This concept explains why some pages display just a group header, as Figure 23-3 shows, when groups in a table have different ACLs.
|