The system administrator installed System Console and a BIRT iHub instance on one computer. This machine contains the shared configuration directory, which all nodes in the cluster access. This section refers to the machine containing the shared configuration directory as node1.
The system administrator installed a BIRT iHub instance on another computer, referred to in this section as node2.
The system administrator performs the following tasks on the cluster node machines to support clustering:
Creates the shared configuration directory
Shares the folders that all cluster nodes access
Configures two nodes to communicate with each other
Specifies a logon account for the Actuate iHub 3 service on a cluster node, if necessary
This section provides examples of these tasks in the Windows environment in an installation performed using the graphical installer.
The following list describes these tasks in more detail within the context of the sequence in which the administrator performs them:
Before adding the first node, the node containing the shared configuration directory, to a cluster in System Console, the system administrator checks the Actuate iHub 3 Service Log On property for whether it specifies an account having administrator privileges, and if necessary, specifies a logon account for the Actuate iHub 3 service that has administrator privileges.
Before adding a second node to a cluster in System Console, the system administrator performs the following tasks:
On node1:
Creates a folder for the shared configuration directory
Shares the configuration and storage folders that all cluster nodes must access
Obtains the machine host name and IP address
Adjusts any network security configuration, such as a firewall, that can prevent shared access between machines
Tests the network accessibility of the machine
Checks Actuate iHub 3 Service Log On property for whether it specifies an account having administrator privileges, and if necessary, specifies a logon account for the Actuate iHub 3 service that has administrator privileges
On node2:
Obtains the machine host name and IP address
Adjusts any network security configuration, such as a firewall, that can prevent shared access between machines
Tests the network accessibility of the machine
Checks Actuate iHub 3 Service Log On property for whether it specifies an account having administrator privileges, and if necessary, specifies a logon account for the Actuate iHub 3 service that has administrator privileges
Before adding a third or subsequent node to a cluster in System Console, the system administrator performs the following tasks on the new node:
Obtains the machine host name and IP address
Adjusts any network security configuration, such as a firewall, that can prevent shared access between machines
Tests the network accessibility of the machine
Checks Actuate iHub 3 Service Log On property for whether it specifies an account having administrator privileges, and if necessary, specifies a logon account for the Actuate iHub 3 service that has administrator privileges
AC_SHARED_HOME is a variable that represents the folder that contains the shared configuration directory, to which all nodes in a cluster share access. This section makes reference to the following AC_SHARED_HOME variable settings:
In a default BIRT iHub installation on Windows, performed using the installer, in which the install folder isC:\Actuate\BIRTiHubVisualization, AC_SHARED_HOME represents the following path:
In a default command-line installation on Windows, in which the install folder is C:\Actuate, AC_SHARED_HOME represents the following path:
C:\Actuate\iHub3\modules\BIRTiHub\iHub\shared
In a default BIRT iHub installation on Linux, in which the install folder is /opt/actuate/iHub3, AC_SHARED_HOME represents the following path:
/opt/actuate/iHub3/modules/BIRTiHub/iHub/shared
The following sections provide examples of the operations necessary to support clustering in the Windows environment in an installation performed using the installer.
Creating the shared configuration directory
The system administrator creates the folder for the shared configuration directory on node1 before adding the second node to the cluster.
How to create the shared configuration directory
On node1, in AC_SHARED_HOME, create a new folder for the cluster to use as the shared configuration directory. For example, create a folder named config_cluster.
Sharing the folders that all cluster nodes access
In a BIRT iHub installation, cluster nodes must have read‑write access to the following folders in AC_SHARED_HOME on node1:
config_cluster
The shared configuration directory. System Console populates this folder when the system administrator adds the second node to the cluster.
storage
Contains the files for the sample volume, Default Volume.
The system administrator shares these folders before adding the second node to the cluster.
The following instructions provide a basic example of the operations required to configure network sharing. It is the responsibility of the system administrator performing this task to make sure that all settings conform to the security policies in force for the environment.
How to share the \config_cluster and \storage folders
To give a cluster node read-write access to these resources on node1 perform the following tasks:
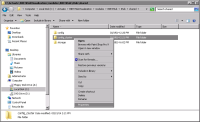
1 Using Windows Explorer on node1, right‑click the config_cluster folder, and choose Properties, as shown in Figure 2‑1.
Figure 2‑1 Choosing Properties
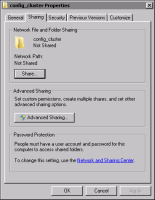
2 On config_cluster Properties, choose Sharing, as shown in Figure 2‑2. On Sharing, choose Advanced Sharing.
Figure 2‑2 Choosing Advanced Sharing
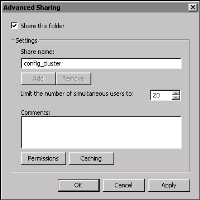
3 On Advanced Sharing, select Share this folder, as shown in Figure 2‑3.
Figure 2‑3 Selecting Share this folder
On Advanced Sharing, choose Permissions.
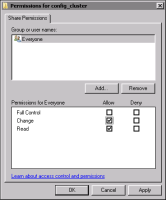
4 On Permissions for config_cluster, in Share Permissions, select Allow for Change and Read, as shown in Figure 2‑4.
Figure 2‑4 Selecting Change and Read permission
Choose OK.
On Advanced Sharing, choose OK.
On config_cluster Properties, take note of the Network Path, as shown in Figure 2‑5. You specify this path when adding the node to the cluster in System Console. Choose Close.
Figure 2‑5 Taking note of the Network Path
5 Repeat steps 1 through 4 for the storage folder that contains the sample volume files. Make sure that all settings conform to the security policies in force for the environment.
In step 4, take note of the Network Path appearing on storage Properties—Sharing. You specify this path when enabling Default Volume in System Console after adding the second node to the cluster.
Close Windows Explorer.
Configuring two nodes to communicate with each other
Before adding a node to a cluster, perform the following tasks to support communication between the node containing the shared configuration directory and the node you are going to add to the cluster.
Turn off a Windows firewall
Obtain the machine name and IP address of each machine
Test the network connection between the two machines
How to turn off a Windows firewall
Perform the following steps on both node1 and node2:
1 Choose Start➛Control Panel➛System and Security➛Windows Firewall.
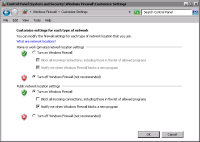
2 On Windows Firewall, choose Turn Windows Firewall on or off. Make sure that the firewall settings conform to the security policies in force for the environment.
3 On Customize Settings, in Home or work (private) network location settings, choose Turn off Windows Firewall, as shown in Figure 2‑6.
Figure 2‑6 Turning off the home or work network location firewall
Choose OK.
How to display a computer’s IP address
To obtain the host names of node1 and the computer on which you will install the cluster node, perform the following tasks on node1 and node2:
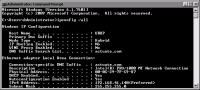
Press Enter. The host name appears, as shown in Figure 2‑7. In this example, the host name for node1 is urup.
Figure 2‑7 Displaying the host name
3 Write the host names and IP addresses of the computers to be clustered, as shown in Table 2‑1.
Table 2‑1 Host names and IP addresses of computers to be clustered
iHub
Host name
IP address
Node1
urup
192.168.41.140
Node2
kozu
192.168.41.138
How to test the connection between computers
Perform the following steps on both computers:
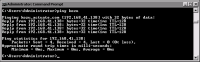
1 In Command Prompt, type the ping command followed by the IP address or host name of the other computer. For example, type the following command to ping a computer named kozu:
ping kozu
Press Enter.
If your computer reaches the other computer, Command Prompt displays a series of replies, as shown in Figure 2‑8.
Figure 2‑8 Receiving a reply to a ping command
2 Close Command Prompt.
Specifying a logon account for the Actuate iHub 3 service on a cluster node
Before adding the node to the cluster, the system administrator checks the Actuate iHub 3 Service Log On property for whether it specifies an account having administrator privileges. If the Log On property does not specify an account having administrator privileges, the system administrator performs the following tasks:
Stops the Actuate iHub 3 service
Specifies a logon account for the Actuate iHub 3 service that has administrator privileges
Restarts the Actuate iHub 3 service
How to check the Actuate iHub 3 Service Log On property
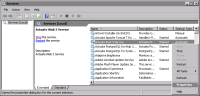
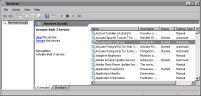
1 Choose Start—Control Panel—System and Security—Administrative Tools—Services. On Services, right-click Actuate iHub 3 Service, and choose Properties, as shown in Figure 2‑9.
Figure 2‑9 Choosing Actuate iHub 3 Service properties
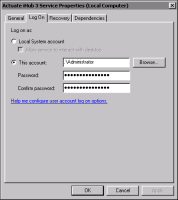
2 On Actuate iHub 3 Service Properties, choose Log on. If This account already specifies an account having administrator privileges, as shown in the example in Figure 2‑10, you do not need to specify a logon account for the Actuate iHub 3 service. Choose Cancel on Actuate iHub 3 Service Properties, and close Services. Otherwise, perform the tasks described in “How to specify a logon account for the Actuate iHub 3 service,” which follows.
Figure 2‑10 Checking the Log On property
How to specify a logon account for the Actuate iHub 3 service
To specify a logon account for the Actuate iHub 3 service, perform the following tasks on the machine, in this example, node2:
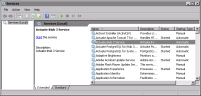
1 Choose Start—Control Panel—System and Security—Administrative Tools—Services. On Services, select Actuate iHub 3 Service. Then, choose Stop the service, as shown in Figure 2‑11.
Figure 2‑11 Stopping the Actuate iHub 3 service
2 On Services, right-click Actuate iHub 3 Service, and choose Properties, as shown in Figure 2‑12.
Figure 2‑12 Choosing Properties for the Actuate iHub 3 service
3 On Actuate iHub 3 Service Properties, perform the following tasks:
1 Choose Log On.
2 In Log On, select This account, and specify an account that has administrator privileges, such as <machine name>\administrator.
3 In Password and Confirm password, type the password for the account.
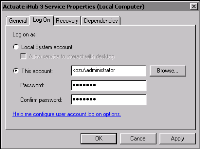
4 Choose Apply. Figure 2‑13 shows Actuate iHub 3 Service Properties, using kozu as an example machine name in This account.
Figure 2‑13 Specifying an account with administrator privileges
Choose OK.
4 On Services, select Actuate iHub 3 Service, and choose Start the service, as shown in Figure 2‑14.