The REST standard supports platform- and language-independent development. This tutorial and following ones in this section use JavaScript, JQuery, and HTML to describe basic implementation details. JQuery is a JavaScript extension library supported by most web browsers and several mobile application platforms.
To use the Actuate REST API, the client must create well-formed REST requests using the HTTP protocol. The application uses JQuery JavaScript libraries and classes to form HTTP REST requests and parse iHub responses.
Task 1: Prepare the HTML web page
In this task, you create a BIRT application, which contains a file, index.html. Alternatively, create an HTML file using a different IDE.
1 Open BIRT Designer Professional.
2 Choose File➛New➛BIRT Project. New BIRT Project appears.
3 In Project Name, type a name for the project, such as REST App Project. Select Blank Project. Choose Finish. The new project appears in Navigator.
4 In Navigator, expand the project that you just created. Double-click index.html. The file opens in the layout editor. The file contains one line of HTML code, similar to the following heading:
<h1>REST App Project</h1><hr>
5 Create html and body elements around the heading line, as shown in the following code:
<html>
<body>
<h1>REST App Project</h1><hr>
</body>
</html>
6 Inside the html element, above the body element, create a head element with a meta tag to specify the UTF-8 character set, similar to the following lines:
<html>
<head>
<metacharset="utf-8" />
</head>
<body>
...
Task 2: Load the jQuery libraries
To use jQuery in a web page, download the jQuery source libraries and stylesheets. Then, reference these resources in the script. Alternatively, use explicit links to jQuery on the web.
1 If you do not already have jQuery installed on your system:
1 Download the latest release of jquery.js from the following location:
http://jquery.com/download/
2 Copy the jquery-<release number>.js to your BIRT project folder.
3 Rename the jquery-<release number>.js in your BIRT project folder to jquery.js.
4 Download a ZIP file containing the latest release of jquery-ui.js and a theme from the following location:
http://jqueryui.com/download/
5 Extract the contents of the zip file to a css folder in your BIRT project folder.
2 Inside the head element, include a script tag, similar to the following lines:
<head>
<metacharset="utf-8" />
<scriptsrc="jquery.js"></script>
</head>
If jquery.js is installed outside your BIRT project folder, provide the path to its location in the src attribute.
3 The examples in this section also use the jQuery UI library and jQuery UI smoothness theme stylesheet. Inside the head element, add further script and link elements to reference these resources, similar to the following lines:
<scriptsrc="css/jquery-ui.js"></script>
<linkrel="stylesheet"href="css/jquery-ui.css" />
If jquery-ui.js and jquery-ui.css are installed outside your BIRT project folder, provide the path to their locations in the src and href attributes.
Task 3: Create a login script
The Actuate REST API /login resource uses username and password values to authenticate a client session with iHub. The response from a login request is either success or failure, and successful requests include an authId string which is required for all other Actuate REST API requests.
This example accesses only the User.Name and authId fields of the response data. You can access additional information using other fields by name.
1 Inside the body element, create nested div elements to assign values to the user name and password variables using HTML text input fields. Use the jQuery function in the body element’s onLoad attribute to clear the input field values. Prepare login and reset buttons.
2 After the div element, create a script element. Inside the script element, create variables to store the path to the login resource, the authentication identifier, user name, and password, and a loginacc structure, using the following code:
<scripttype="text/javascript">
var uriLogin = 'http://mymachine:5000/ihub/v1/login';
var authId;
var username;
var password;
var loginacc = {
'username':'',
'password':''
};
</script>
3 Add further jQuery script lines to the script to handle the reset button and log the text that a user types into an input field using the keyup event listener for each input, as shown in the following code:
// Reset all page data
$( '#reset' ).click( function ( ) { resetAll( )});
// handle username field change
$('#input_username').keyup( function( ) {
username = $( this ).val( );
});
// handle password field change
$( '#input_password' ).keyup( function( ) {
password = $( this ).val( );
});
4 Write jQuery script to move the username and password values into the loginacc object when the user presses the login button. Assign an empty string to the password if the user does not provide a password, as shown in the following code:
// process login button
$( '#login' ).click( function( ){
if(password){
loginacc = {
'username':username,
'password':password
}
} else {
loginacc = {
'username':username,
'password':''
}
};
});
The administrator user in the default iHub volume has an empty password.
5 Before the closing }) line of script, write jQuery script to make a request to iHub and parse the response. The Actuate REST API accepts requests in JSON format using utf-8 encoding. Use the JSON.stringify( ) function to format the loginacc variable. An AJAX POST request sends the correctly formatted information as a login request. Set the URL attribute of the request to the resource URL for login. In the AJAX request, include a success function that saves the authId and a failure function that provides a message to the user and clears the input fields, as shown in the following code:
6 Add the following function to clear all the page content:
function resetAll() {
$( 'input:text' ).val( "" );
$( '#output' ).empty( );
}
7 Save and run the HTML file:
1 Choose File➛Save.
2 Copy this file into a web application deployed to a web server. Then, type the URL of the page into a web browser. Alternatively, double-click the file in Windows Explorer. In username, type:
Administrator
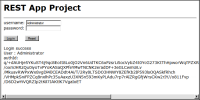
3 Choose Login. The login form appears as shown in Figure 15‑8.
Figure 15‑8 Logging in to iHub using the REST API
8 Copy the HTML file to login.html. Later tutorials use this file as a starting position.
The complete code for this example is provided in Listing 15‑1. Copy and paste this code into a text editor to create the complete example. To run the example, change mymachine to the fully qualified domain name of your REST API server.
Listing 15‑1 An Actuate REST API sample login page using JQuery