Specifying what data to retrieve from a web service
A web service provides application functionality from a remote server, which makes the creation of a web service data set more complex than the other data set types. While the wizard guides you through the steps to supply the necessary information, it helps to understand generally how the data set communicates with a web service. The data set performs the following tasks:
It sends a SOAP request to the web service. The request specifies the action you want the web service to perform and the parameter values to use when performing the action. For example, the request can be to run a mortgage calculator, and the parameter values to send are the loan years, interest rate, loan amount, annual tax, and annual insurance.
The data set specifies the format of the SOAP response to use when the web service sends data back to the report.
Finally, the data set specifies the data that the web service should return. For example, in the case of a mortgage calculator, you can choose to get just the total monthly mortgage payment, or get additional data, such as monthly principal and interest, monthly tax, and monthly insurance.
The data set wizard constructs the SOAP request and response based on the web service operation and schema you select. For well-defined web services, you can use the generated SOAP request and response without any modifications, so while knowledge of SOAP can be helpful, it is typically not required. The wizard also displays, in XML format, all the data that the operation can return, so all you do is select the data that you want to use in the report, then map the data to rows and columns.
How to create a data set to retrieve data from a web service
This procedure shows how to retrieve data from a public web service that returns the weather forecast for a specified U.S. zip code. This procedure uses the web service data source, Weather_ws, for which the creation procedure is provided in the previous topic.
1 In Data Explorer, right-click Data Sets, then choose New Data Set.
2 In New Data Set, specify the following information:
1 In Data Source Selection, select the web services data source, Weather_ws. Data Set Type displays Web Services Data Set.
2 In Data Set Name, type a name for the data set, then choose Next.
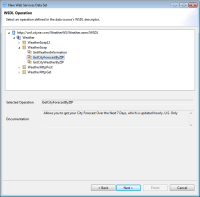
New Web Services Data Set displays the URL to the WSDL document, which describes the services or operations provided by the web service. You specified the WSDL URL when you created the data source.
3 Expand the WSDL URL. Expand WeatherSoap, then select GetCityForecastByZIP, as shown in Figure 8‑2.
Figure 8‑2 Selecting the GetCityForecastByZIP operation from WeatherSoap
Choose Next.
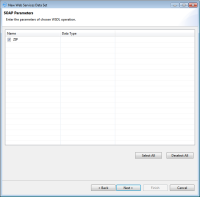
New Web Services Data Set displays the parameter used by the GetCityForecastByZIP operation, as shown in Figure 8‑3. The parameter, selected by default, defines the zip code for which to return the weather forecast.
Figure 8‑3 Parameters and specified default values
Choose Next.
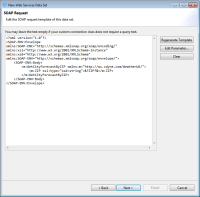
BIRT generates a SOAP request template based on the WSDL document and your parameter selection, as shown in Figure 8‑4. The body section of the SOAP request tells the web service to run the GetCityForecastByZIP operation, using the value of the ZIP parameter. The parameter notation, &?ZIP?&, indicates that a value can be inserted in the SOAP request at run time.
Figure 8‑4 SOAP request template
4 Specify a value for the ZIP parameter, using the following steps:
1 Choose Edit Parameter.
2 In SOAP Request, select the ZIP parameter, then choose Edit.
3 In Edit parameter property, in Default Value, type a zip code, such as 94044. Choose OK.
5 Choose OK to save your changes to the SOAP request.
Choose Next. New Web Service Data Set displays the options for constructing a SOAP response, as shown in Figure 8‑5.
Figure 8‑5 Options for constructing a SOAP response
6 Choose Next to accept the default options, which is the typical case for most well-defined web services.
New Web Services Data Set displays an XML structure of the web service.
7 Select an element to map to a data set row, using the following steps:
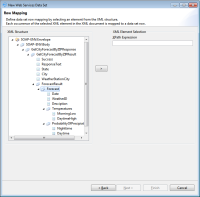
1 In XML Structure, expand all the items, then select Forecast, as shown in Figure 8‑6. Forecast defines the data root node of the data row returned by the weather forecast service.
Figure 8‑6 Select an element to map as a table
2 Click the > button.
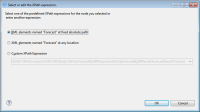
The Select or edit the XPath expression dialog, shown in Figure 8‑7, prompts you to select a generated XPath expression, or to write a custom XPath expression. The expression defines the path to the selected XML element.
Figure 8‑7 Options for specifying an XPath expression
3 Choose OK to accept the generated XPath expression selected by default.
4 Choose Next.
8 In Column Mapping, select the elements to map to columns.
1 In XML Structure, expand Forecast, then Temperatures.
The GetCityForecastByZIP operation returns several categories of data. For this example, assume that you want to retrieve only the following data: Date, MorningLow, and DaytimeHigh contained in the Forecast node and City, which is at a higher level than Forecast.
2 Select the City element, which is at the same level as ForecastResult. Click the > button to create the XPath expression that maps the selected element as a column. In Column Mapping, accept the default data type of String, then choose OK.
3 Select the Date element and click the > button. In Column Mapping, change the data type to Date Time, then choose OK.
4 Select MorningLow and click the > button. In Column Mapping, change the data type to Integer, then choose OK.
5 Select DaytimeHigh and map it to an Integer column as for MorningLow.
9 Choose Finish.
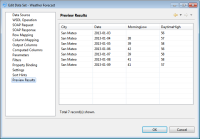
10 In Edit Data Set, choose Preview Results.
The data set returns the date, and the maximum and minimum temperatures for zip code 94044, as shown in Figure 8‑8.
Figure 8‑8 Results returned by the web service data set
Choose OK.
When you use this data in a report, each time the report is run, the data set gets the weather forecast for the current day and for zip code 94044. While this data may be all you want to display in your report, the typical case when using a web service is to enable the report user to supply parameter values at run time. In the weather forecast example, you can make the report more interesting by prompting the user to specify the zip code for which to get weather information. For many web services, such as a mortgage calculator or a currency converter, incorporating web service data in the report makes sense only if users can specify parameter values to get the data they want.
The solution is to create report parameters to prompt the user for values. The user-specified values are then passed to the data set, which, in turn, passes those values to the web service through the SOAP request. The procedure for implementing this solution is described next. The procedure describes how to create a basic report parameter.
How to enable a user to provide parameter values to a web service
This procedure continues with the weather forecast example.
1 Create a report parameter to get the zip code at run time, using the following steps:
1 In Data Explorer, right-click Report Parameters, then choose New Parameter.
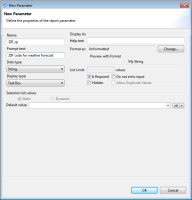
2 In New Parameter, supply the following information:
In Name, type a name for the report parameter. For example:
ZIP_rp
In Prompt text, specify a word or sentence to prompt the report user to provide a zip code. For example:
ZIP code for weather forecast
In Data type, select String.
Use the default values for the other attributes.
Figure 8‑9 shows the completed report parameter definition.
Figure 8‑9 Report parameter to get the zip code
3 Choose OK. The ZIP_rp parameter appears under Report Parameters in Data Explorer.
2 Edit the data set parameter and link it to the report parameter.
1 In Data Explorer, right-click the web service data set, then choose Edit.
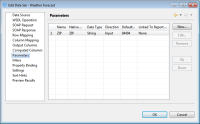
2 In Edit Data Set, select Parameters. As Figure 8‑10 shows, the Parameters page displays the ZIP parameter defined in the GetCityForecastByZIP operation. The parameter’s default value is set to 94044, which is the value specified when you defined the data set.
Figure 8‑10 Data set parameter
3 Select the ZIP parameter, then choose Edit.
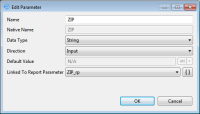
4 In Edit Parameter, in Linked To Report Parameter, select ZIP_rp, as shown in Figure 8‑11. In the message that appears, choose Yes, then choose OK.
Figure 8‑11 Link the data set parameter to the report parameter
3 Choose OK to save your changes to the data set.
4 Test the web service functionality in a report.
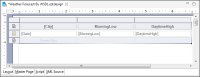
1 Drag the web service data set from the Data Explorer and drop it in the layout editor. In Data Set Binding, choose Select All. Then, choose OK. BIRT creates a table and data elements to display the weather data. Format the table to put the city field in the heading row, as shown in Figure 8‑12.
Figure 8‑12 Report design to display the weather forecast data
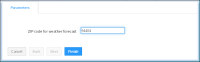
2 Choose Run➛View Report➛In Web Viewer. Enter Parameters displays the report parameter to get the zip code value.
3 Type a zip code, as shown in Figure 8‑13. Choose OK.
Figure 8‑13 Zip code specified for the report parameter
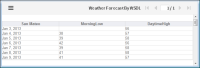
The report displays weather data for that zip code. Figure 8‑14 shows an example.
Figure 8‑14 Report displaying weather data for the specified zip code