Although JSPs can use HTML to set colors, fonts, and other stylistic elements directly, the JSPs also use cascading style sheets (CSS), templates, and shared images to control the global styles of an Information Console web application. To modify the appearance of the entire Information Console web application, change global style elements.
Global style definitions are located in the <context root>\common\jslib\themes\default\yggdrasil.css file. To change the company logo displayed in the banner, modify the background:url property of the .ac .navbar .actuate class definition. This class definition in yggdrasil.css includes other properties, as shown in the following code:
To change the logo, replace the default value of actuate_logo_navbar.png with a custom logo file name, either as an absolute path, or as the same relative path as the default image by saving the image file in the <context root>\common\jslib\themes\img directory.
To change the background color or height of the top navigation bar, modify the value of the .ac .navbar-inner class definition.This class definition in yggdrasil.css includes other properties, which is shown in the following code:
Replace the default value of the height parameter to change the height of the top navigation bar and change the value of the background parameter to change the color of the top navigation bar.
How to customize the company logo and banner color
1 Copy your custom logo image file to the following directory:
4 Change the filename of the background image to the name of custom logo image file and change the width and height dimensions to match the custom image dimensions. For example, if the custom image file was called examplecorp_logo.gif and it had a height of 153 pixels and a width of 37 pixels, you would use the following entry:
6 Change the value of the height and the background to complement the custom logo. For example, if the custom logo has a yellow background and requires 60 pixels of height with its padding to be centered vertically on the navigation bar, you would use the following entry:
.ac .navbar-inner {
position: relative;
height: 60px;
padding-left: 15px;
padding-right: 0px;
background: #FFFF00;
7 Save web.xml. Then, restart the Actuate iHub 3.1 Service to apply the changes.
1 Choose Start➛Control Panel. Open Administrative Tools.
2 In Administrative Tools, choose Services.
3 In Services, select Actuate iHub 3.1 Service and choose Restart.
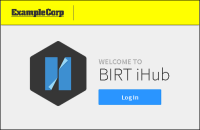
8 Open the Information Console application in a web browser to view the new custom navigation bar. For example, if you specified an image, examplecorp_logo.png, your landing page appears as shown in Figure 3‑2.
Figure 3‑2 Viewing a custom logo and banner in Information Console