Before installing Information Console, you must prepare the operating system environment to ensure that you have all the necessary software and configuration resources in place. This section describes how to prepare the environment before starting the Information Console installation process. This section discusses deployment concerns that affect your Information Console installation and how you wish to deploy reports to the web.
To deploy a report to the web, you need:
The Information Console WAR or EAR file appropriate to your web or application server.
An application server or JSP or servlet engine such as the Actuate embedded servlet engine or IBM WebSphere.
One or more Actuate designer tools and Actuate BIRT iHub System with Information Console administration.
Actuate BIRT iHub administrator privileges.
Permission to read, write, and modify operating system directories as necessary. For example, the directory Java uses to hold temporary files is defined by the java.io.tmpdir property and is by default the value of the TMP system variable in the Windows environment and /var/tmp in the UNIX and Linux environments. Read and write permission must be provided to the application server running Information Console for this directory.
For optimal appearance of Information Console pages, ensure that ClearType is set on the Windows system used to access Information Console.
Setting ClearType text properties
Using ClearType text on a Windows system provides the optimal appearance for BIRT iHub pages. All Information Console users need this configuration setting.
How to configure ClearType text
To configure ClearType text, perform the following steps.
1 In Windows Control Panel—Appearance and Personalization, choose Adjust ClearType text. ClearType Text Tuner appears.
2 Select Turn on ClearType. Choose Next.
3 For each of the pages in ClearType Text Tuner, select the sample that looks best to you and then choose Next.
4 In You have finished tuning the text on your monitor, choose Finish.
Setting up Information Console
You install Information Console in either of two ways:
As a stand-alone web application. This method enables native load balancing for iHub clusters, redundancy to support constant report services over the web, and secure networks using firewalls and proxy severs.
Automatically on the same host with iHub. This method provides reports locally on each iHub machine.
For enterprise architectures, installing Information Console on several web or application servers is recommended.
BIRT iHub Visualization Platform installs Information Console automatically on the machine where it resides. Typically, a manual Information Console installation is done to provide network access to iHub from a remote machine.
To access online documentation, such as the online help and PDF files of the product manuals, navigate to the following location:
http://developer.actuate.com
Installing Information Console as a stand-alone application
This procedure installs Information Console as a separate web application without integrating a new node with an iHub cluster.
1 Install Information Console on the client system using the install script.
1 Extract iHub3.zip to a folder on the file system just as you would for an iHub Installation.
2 Open acinstall.properties for editing.
3 Modify the value of the ac.package parameter to include c, which is the code for Information Console, and m, which is the code for JDK, if you do not have a JDK already installed on the system, as shown in the following code:
ac.package=m,c
4 Save acinstall.properties and close it.
5 Choose Start and type cmd. Then, type Ctrl+Shift+Enter to run the command window as Administrator.
6 Navigate to the iHub extraction folder and type install. The installer installs Information Console and the JDK the Actuate iHub 3.1 Service uses.
7 Exit the command line.
2 Navigate to the <context root>\WEB-INF directory and open web.xml for editing.
3 Find the SAMLEntityID parameters and change the parameter value to the iportal service URL for the iHub Server. For example, if the iHub server was deployed on server1, the SAMLEntityID parameter would look like the following:
1 Choose Start➛Control Panel. Open Administrative Tools.
2 In Administrative Tools, choose Services.
3 In Services, select Actuate iHub 3.1 Service and choose restart.
6 Open a web browser and navigate to the system console for the iHub Server. The default URL for the system console is shown in the following URL:
http://iHubSystem:8500/sysconsole
iHubSystem is the fully qualified domain name or IP address of the iHub Server system.
7 Choose Clusters. Open the context menu for a cluster and choose edit.
8 Choose Single Sign-On, and choose iHub User Management (default) from the Select User Management drop-down menu.
9 Choose Add Service provider.
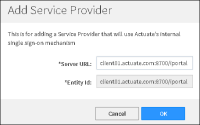
10 In Add Service Provider, in Server URL type the iportal application URL for the Information Console. Entity Id fills automatically, as shown in Figure 2‑1.
Figure 2‑1 Adding a Service Provider for Information Console
Choose OK, then choose Save. On the confirmation dialog, choose OK