This example illustrates how to integrate BIRT iHub resources into a web application using HTML and JavaScript. This application is designed for a minimum screen size of 1024 x 768px.
The Actuate REST API authenticates the application and retrieves data used to build navigation links and information about files on the demonstration BIRT iHub 3.1 server.
The Actuate JavaScript API (JSAPI) retrieves data and visualizations from a server. The iHub server resources used by this example are included with the source code.
This example application demonstrates the following functionality:
User authentication to a user account residing on a BIRT iHub server
Searching for the file ID of a BIRT data object
Downloading a list of location names from the BIRT data object
Building an interactive list of location names
Executing a BIRT design to update data and create a BIRT document using the selected state as a parameter value
Searching for the file ID of the generated BIRT report document
Retrieving meta-data about the BIRT document
Loading BIRT visualizations into different DIV elements of the web page
When the web application first loads, it authenticates with the iHub server and retrieves a JSON formatted list of region and state names.
After using REST API to extract location names from a BIRT data object, this application builds navigation links. When a user selects a link, the REST API generates a report for the selected location if a valid one does not already exist. The Actuate JSAPI then displays items from the report in the DIV elements of the HTML page.
The index.html file contains the following HTML DIV elements:
startPage, containing the landing page for the application
content, containing a menu and report content
leftSidebarDiv, containing the menu of location names
mainDiv, containing the loading animation and user selected visualizations
overlay, containing loading message while data is downloads
container, containing navigation buttons and report visualizations
The container DIV contains the following DIV elements:
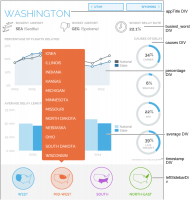
appTitle, containing the name of the location
nextButton and backButton to navigate the list of locations
busiest_worst, containing the bookmarked grid named busiest_worst
percentage, containing the bookmarked chart named percentage
average, containing the bookmarked chart named average
causes, containing the bookmarked grid named causes, displaying pie charts
timestamp, containing the time and date the report was generated
Figure 1‑1 User interface displaying a list, charts, and navigation buttons
This example writes data to the JavaScript console of the web browser for debugging purposes. When the application authenticates with an iHub server the word success appears in the JavaScript console.
When the user selects a location, the region name, state abbreviation, and generated report are displayed in the JavaScript console. The following console output shows the result of a user selecting the state of Washington:
region = West
state = WA
filename = /Home/West/WA.rptdocument
Cleared div mask
While a new report is generated, a temporary DIV appears in the application notifying the user that data is loading. After the report generation finishes, the report items download to the web application and the loading DIV is cleared.